Install Wanos VM on Azure
This is the Wanos install guide for Microsoft Azure through Powershell. Wanos can also be deployed directly from the Azure Market Place. Please read and familiarize with the basics before deploying the appliance into production. This guide follows the Tunnel deployment.
Table of Contents
Introduction
Windows Powershell
Wanos VM Install Step-By-Step
Logging in to Azure Resource Manager
Setting Global Variables
Create a new Resource Group
Create and Configure a new Virtual Network
Create and Configure a Virtual Network Interface
Create and Configure a Network Security Group
Create Network Security Group Access Rules
Create Storage Account and Storage Container
Copy Wanos VHD to Local Storage Container
Create Wanos Virtual Machine
Routing Requirements
Full Deployment Script
Update Software
License Activation
Username and Password
Introduction
It is recommended to deploy Wanos from the Azure Market Place. Where this option is not available the following deployment steps can be used the Wanos Virtual Machine (VM) on Microsoft Azure via PowerShell.
Azure has two deployment models, Azure Service Manager (ASM) and Azure Resource Manager (ARM). This guide uses the ARM deployment model which is the preferred deployment model as communicated by Microsoft. More information on the details of each model can be found here: https://docs.microsoft.com/en-us/azure/azure-resource-manager/resource-manager-deployment-model
Windows Powershell
The Wanos VM can be deployed from the Azure Market Place. The rest of the guide are instruction on deploying the VM using Windows PowerShell.
To install PowerShell please visit this link and follow the steps provided: https://docs.microsoft.com/en-us/powershell/scripting/setup/installing-windows-powershell?view=powershell-5.1. Please ensure you have the latest version of PowerShell installed.
You will also need to have the AzureRM Module installed. To check if this is included with your version of PowerShell please run the following command: Get-Module -ListAvailable AzureRM
If you do not have the AzureRM Module installed or if the module is a version earlier than 3.6. then please go to this link and follow the instructions: https://docs.microsoft.com/en-us/powershell/azure/install-azurerm-ps?view=azurermps-4.3.1
You can also use the Azure Portal (https://portal.azure.com) to configure many of the settings that the PowerShell steps in this document take. This document only details the PowerShell steps needed to get your Wanos VM up and running.
Wanos VM Install Step-By-Step
Logging in to Azure Resource Manager
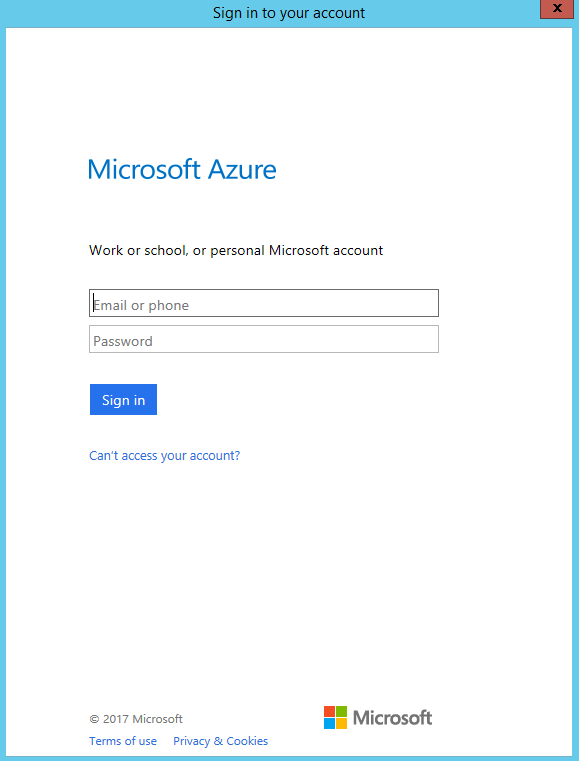
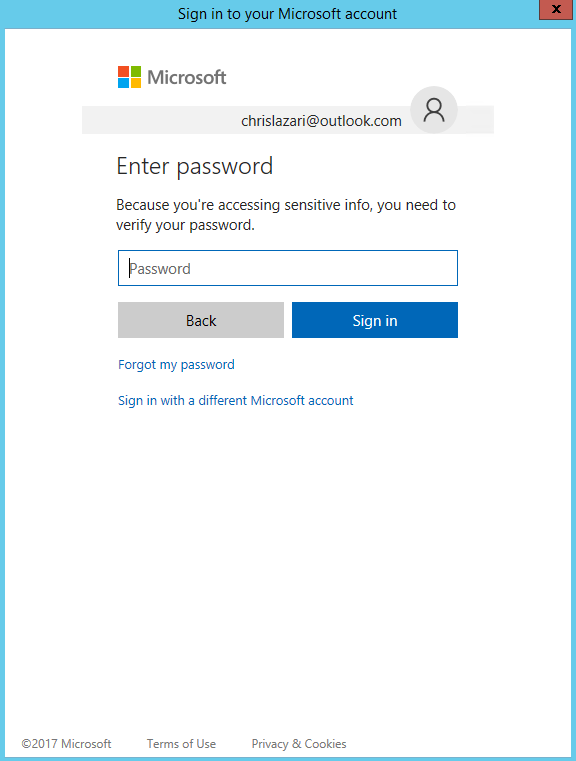
To login to Azure Resource Manager run the following at Azure PowerShell prompt: Login-AzureRmAccount

You will be presented with a web login box. Enter your Azure Subscription Account details and the password when prompted to do so as shown in the images below.
Once you have logged in successfully you will be provided with the details of the subscription as shown in the image below.
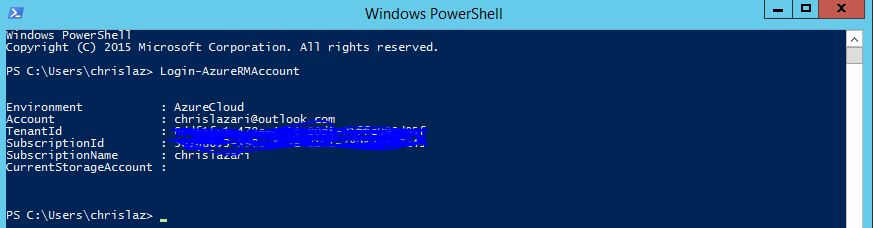
If your Azure account has access to multiple subscriptions you need to select which subscription you are going to deploy Wanos to. To get a list of subscriptions run the following command: Get-AzureRmSubscription
Then run: Select-AzureRmSubscription -SubscriptionName <Subscription Name>. In the example below the subscription name is chrislazari.

Setting Global Variables
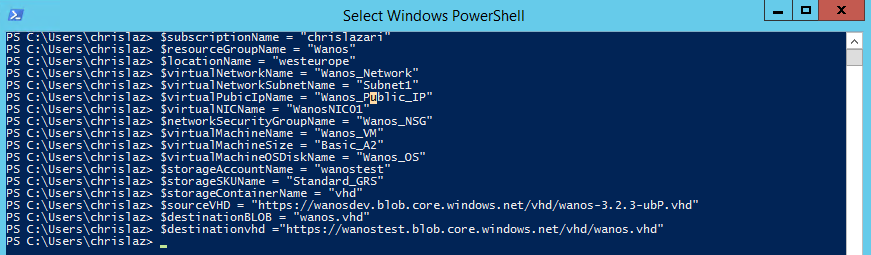
The script that creates the Wanos VM for you uses many variables that need to be set before you start running the necessary cmdlets. Below is the list of variables and details about each one.
- $subscriptionName = “chrislazari” – Must change to your subscription name. In this example, it is chrislazari
- $resourceGroupName = “Wanos” – This is the resource group that will be created and will house all the necessary resources for Wanos. If you have no resource group named Wanos, then it is recommended you use the default set in this example.
- $locationName = “westeurope” – This variable sets the Azure Data Center location where you Wanos resources will be hosted. In this example, we are using the West Europe Data Center. To see a list of Azure Data Centers run the following PowerShell command: Get-AzureLocation or visit this link: https://azure.microsoft.com/en-us/overview/datacenters/how-to-choose/
- $virtualNetworkName = “Wanos_Network” – This variable sets the network name which your VM will be running on. You can leave it as shown or change it.
- $virtualNetworkSubnetName = “Subnet1” – This variable sets the subnet name on the virtual network you will be creating. You can leave it as shown or change it.
- $virtualPublicIpName = “Wanos_Public_IP” – This variable sets the name for the Public IP resource as it will be displayed on the Resource Manager. You can leave it as shown or change it.
- $virtualNICName = “WanosNIC01” – This variable sets the name for the Virtual Network Interface Card resource as it will be displayed on the Resource Manager. You can leave it as shown or change it.
- $networkSecurityGroupName = “Wanos_NSG” – This variable sets the name for the Network Security Group that will be created. You can leave it as shown or change it.
- $virtualMachineName = “Wanos_VM” – This variable sets the name of your Wanos virtual machine. You can leave it as shown or change it.
- $virtualMachineSize = “Basic_A2” – This variable sets the size of the VM that will be running Wanos. The current setting of “Basic_A2’ has sufficient resources that meet the minimum required specification. For a list of possible Azure virtual machine sizes run the command Get-AzureRmVMSize $locationName | Out-GridView after setting the $locationName variable.
- $virtualMachineOSDiskName = “Wanos_OS” – This variable sets the name of your Wanos virtual machine Disk. You can leave it as shown or change it.
- $storageAccountName = “wanostest” – Set this variable to your storage account or alternative set the storage account name that will be created in Create Storage Account and Storage Container. This will be to house the Wanos Virtual Hard Disk (VHD). Note that every storage account name on Azure must be unique so if a name that you have chosen has been taken you will need to change this variable. All storage names must be in lower case and can only consist of letters and numbers. In this example, we are using wanostest.
- $storageSKUName = “Standard_GRS” – This variable sets the SKU of the storage account i.e. the necessary redundancy and associated cost. You can find a list of possible SKU’s on this webpage: https://docs.microsoft.com/en-us/powershell/module/azurerm.storage/new-azurermstorageaccount?view=azurermps-4.3.1. In this example, we are using Standard_GRS which is Geo-redundant storage.
- $storageContainerName = “vhd” – This variable sets the name for the storage container within the storage account hosting the Wanos VHD. You can leave it as shown or change it.
- $sourceVHD = “https://wanosds0.blob.core.windows.net/vhd/wanos-427.vhd” – This variable sets the location of the source VHD. This variable must be set as shown here.
- $destinationBLOB = “wanos.vhd” – This variable sets the name of the Wanos VHD once it is copied to your storage container. You can leave it as shown or change it.
- $destinationvhd =”https://wanostest.blob.core.windows.net/vhd/wanos.vhd” – This variable sets the VHD location the VM will use once its configured. It must be set as is. You must ensure you change the text in red to your storage account name or create a new one as discussed in Create Storage Account and Storage Container. In this example, it is wanostest.
Run each command to ensure your variables are all set for the scripts as shown in the image below.
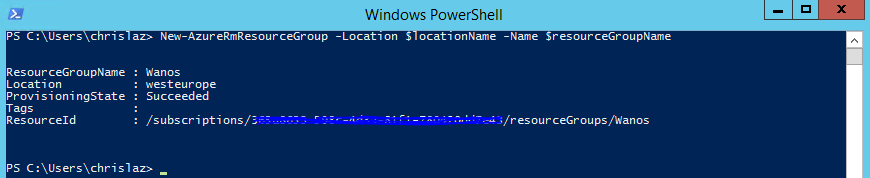
Create a new Resource Group
The first step in creating the Wanos VM is to create a Resource Group on Azure which will house all the resources needed for the Wanos VM.
To create a new Resource Group run the following command:
-
New-AzureRmResourceGroup -Location $locationName -Name $resourceGroupName
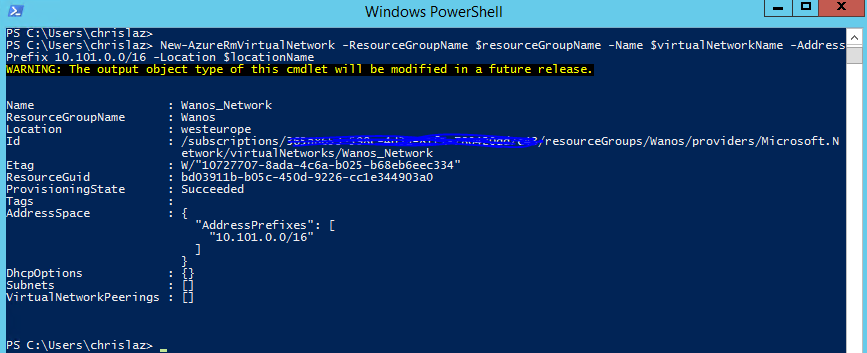
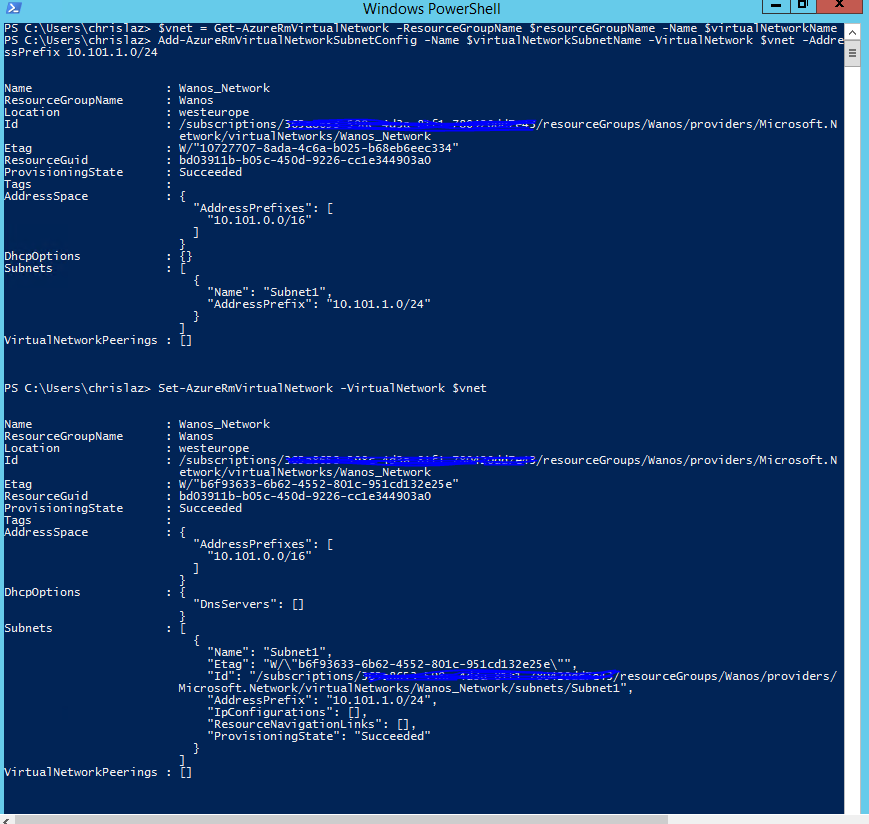
Create and Configure a new Virtual Network
The Wanos VM requires a virtual network to host it on Azure. Run the following commands to create and configure the Virtual Network.
-
New-AzureRmVirtualNetwork -ResourceGroupName $resourceGroupName -Name $virtualNetworkName -AddressPrefix 10.101.0.0/16 -Location $locationName
-
$vnet = Get-AzureRmVirtualNetwork -ResourceGroupName $resourceGroupName -Name $virtualNetworkName
-
Add-AzureRmVirtualNetworkSubnetConfig -Name $virtualNetworkSubnetName -VirtualNetwork $vnet -AddressPrefix 10.101.1.0/24
-
Set-AzureRmVirtualNetwork -VirtualNetwork $vnet
Create and Configure a Virtual Network Interface
The Wanos VM requires a virtual network interface to connect to the virtual network created in the previous step. Run the following commands to create and configure the Virtual Network Interface.
-
$virtualNetwork = Get-AzureRmVirtualNetwork -ResourceGroupName $resourceGroupName -Name $virtualNetworkName
-
$publicIp = New-AzureRmPublicIpAddress -Name $virtualPublicIpName -ResourceGroupName $ResourceGroupName -Location $locationName -AllocationMethod Dynamic
-
$networkInterface = New-AzureRmNetworkInterface -ResourceGroupName $resourceGroupName -Name $virtualNICName -Location $locationName -SubnetId $virtualNetwork.Subnets[0].Id -PublicIpAddressId $publicIp.Id

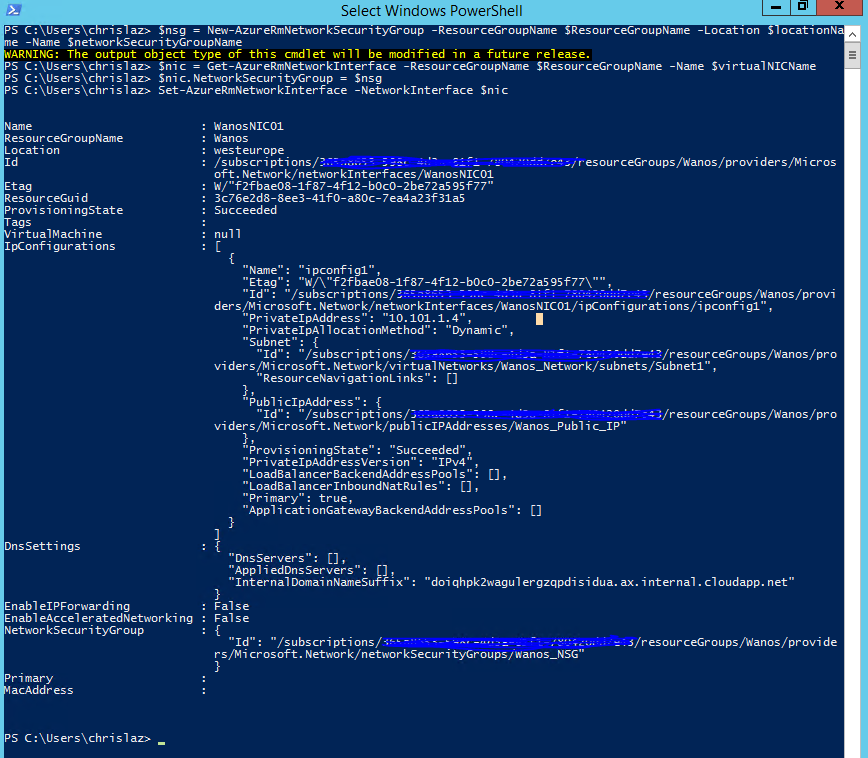
Create and Configure a Network Security Group
The next step is to create and configure a Network Security Group (NSG) and bind it to the virtual NIC created in the previous step. The NSG manages access to and from your Wanos VM. To create a Network Security Group and bind it to the virtual NIC run the following commands:
-
$nsg = New-AzureRmNetworkSecurityGroup -ResourceGroupName $ResourceGroupName -Location $locationName -Name $networkSecurityGroupName
-
$nic = Get-AzureRmNetworkInterface -ResourceGroupName $ResourceGroupName -Name $virtualNICName
-
$nic.NetworkSecurityGroup = $nsg
-
Set-AzureRmNetworkInterface -NetworkInterface $nic
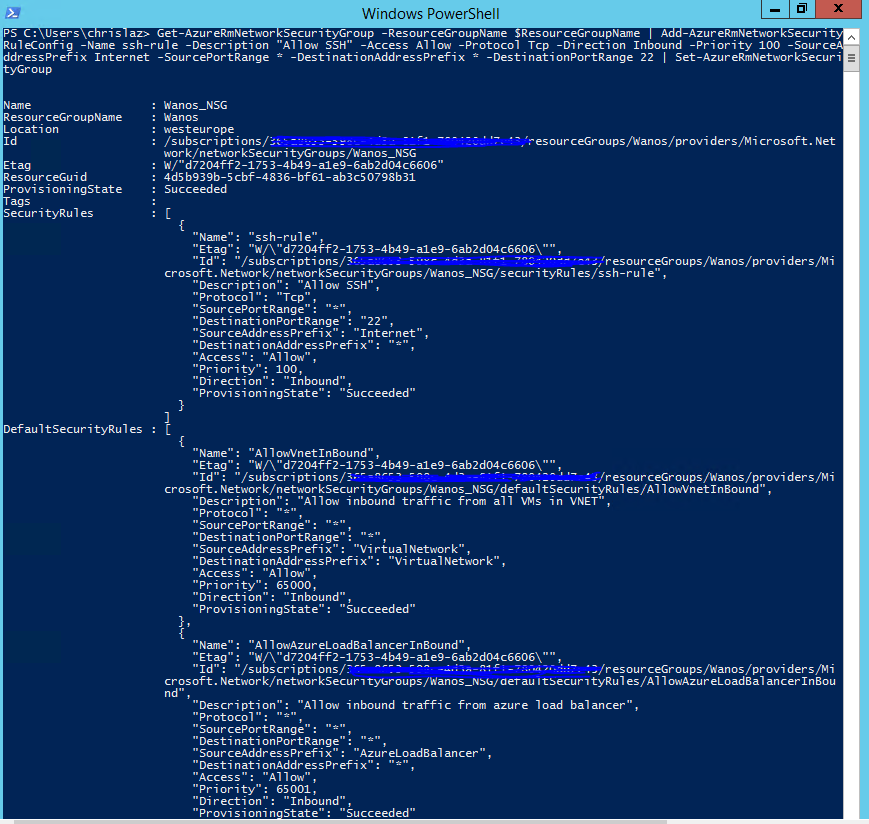
Create Network Security Group Access Rules
Now that the NSG has been created we need to configure access rules to allow traffic inbound to the Wanos VM. Wanos requires SSH access as well as HTTPS access. To configure these rules run the following commands.
-
Get-AzureRmNetworkSecurityGroup -ResourceGroupName $ResourceGroupName | Add-AzureRmNetworkSecurityRuleConfig -Name tunnel-rule -Description "Allow UDP 4050" -Access Allow -Protocol Udp -Direction Inbound -Priority 100 -SourceAddressPrefix Internet -SourcePortRange * -DestinationAddressPrefix * -DestinationPortRange 4050 | Set-AzureRmNetworkSecurityGroup
-
Get-AzureRmNetworkSecurityGroup -ResourceGroupName $ResourceGroupName | Add-AzureRmNetworkSecurityRuleConfig -Name ssh-rule -Description "Allow SSH" -Access Allow -Protocol Tcp -Direction Inbound -Priority 101 -SourceAddressPrefix Internet -SourcePortRange * -DestinationAddressPrefix * -DestinationPortRange 22 | Set-AzureRmNetworkSecurityGroup
-
Get-AzureRmNetworkSecurityGroup -ResourceGroupName $ResourceGroupName | Add-AzureRmNetworkSecurityRuleConfig -Name https-rule -Description "Allow HTTPS" -Access Allow -Protocol Tcp -Direction Inbound -Priority 102 -SourceAddressPrefix Internet -SourcePortRange * -DestinationAddressPrefix * -DestinationPortRange 443 | Set-AzureRmNetworkSecurityGroup
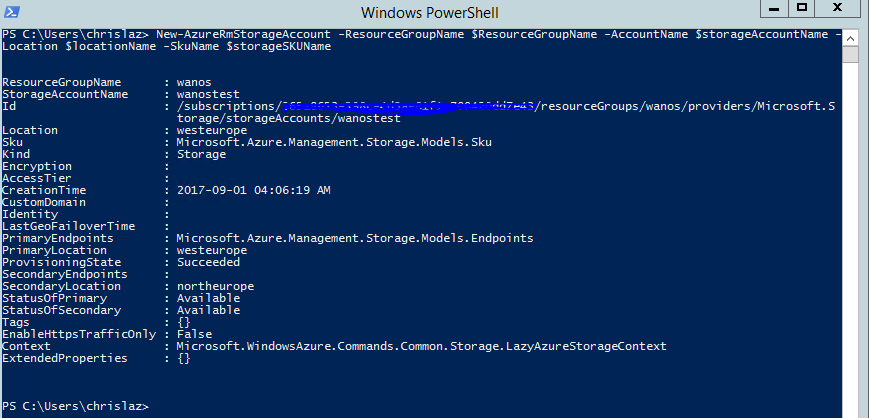
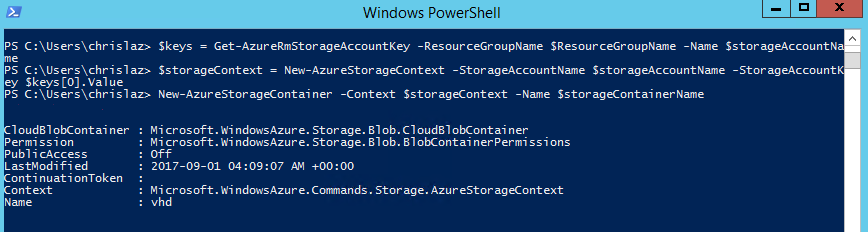
Create Storage Account and Storage Container
Now that the network configuration is complete we need to configure the storage that will house the Wanos VHD. First, we need a Storage Account and within that Storage Account we need a Storage Container. To create these run the following commands.
-
New-AzureRmStorageAccount -ResourceGroupName $ResourceGroupName -AccountName $storageAccountName -Location $locationName -SkuName $storageSKUName
-
$keys = Get-AzureRmStorageAccountKey -ResourceGroupName $ResourceGroupName -Name $storageAccountName
-
$storageContext = New-AzureStorageContext -StorageAccountName $storageAccountName -StorageAccountKey $keys[0].Value
-
New-AzureStorageContainer -Context $storageContext -Name $storageContainerName
Copy Wanos VHD to Local Storage Container
Now that the storage has been created we can copy the Wanos VHD from its source. To do this run the following commands.
-
$keys = Get-AzureRmStorageAccountKey -ResourceGroupName $ResourceGroupName -Name $storageAccountName
-
$storageContext = New-AzureStorageContext -StorageAccountName $storageAccountName -StorageAccountKey $keys[0].Value
-
$blob1 = Start-AzureStorageBlobCopy -srcUri $sourceVHD -DestContainer $storageContainerName -DestBlob $destinationBLOB -DestContext $storageContext

Create Wanos Virtual Machine
Everything is now in place to create the Wanos VM and get it up and running. To do this run the following commands.
-
$vmConfig = New-AzureRmVMConfig -VMName $virtualMachineName -VMSize $virtualMachineSize
-
$vmConfig = Set-AzureRmVMOSDisk -VM $vmConfig -Name $virtualMachineOSDiskName -VhdUri $destinationVhd -CreateOption Attach -Linux
-
$vmConfig = Add-AzureRmVMNetworkInterface -VM $vmConfig -Id $networkInterface.Id
-
$vm = New-AzureRmVM -VM $vmConfig -Location $locationName -ResourceGroupName $resourceGroupName

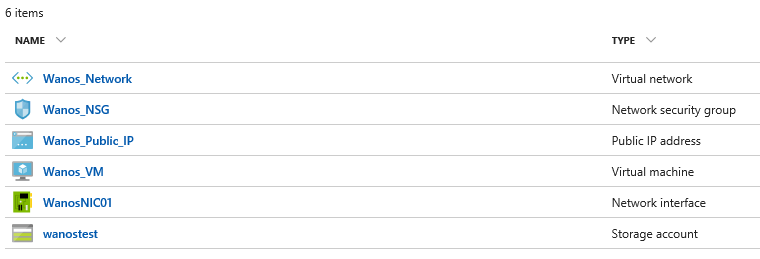
The process is now complete. To check that everything is in place got to the Azure Portal (https://portal.azure.com) and open up the Resource Group you created. You should see all the resources listed there as per the image below.
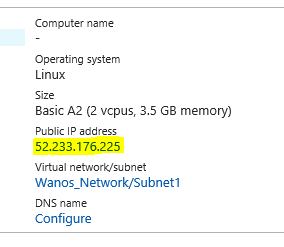
To login to your VM open the VM Overview by clicking on the VM icon in the image above. Make a note of the Public IP Address as shown in the image below and then use your favourite SSH client to login to the VM.
Routing Requirements
In tunnel mode traffic to be optimized needs to be routed to the Wanos VM. The following steps can be used to allow the Wanos VM to route traffic from the Azure subnets to the on-premises networks. This routing configuration assumes the tunnel polices are already configure as per the tunnel mode configuration guide.
Summary:
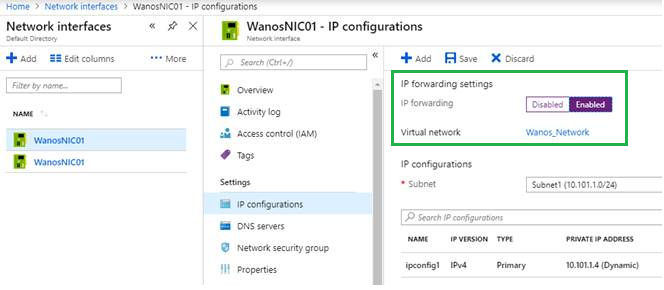
Enable IP Forwarding on WanosNIC01
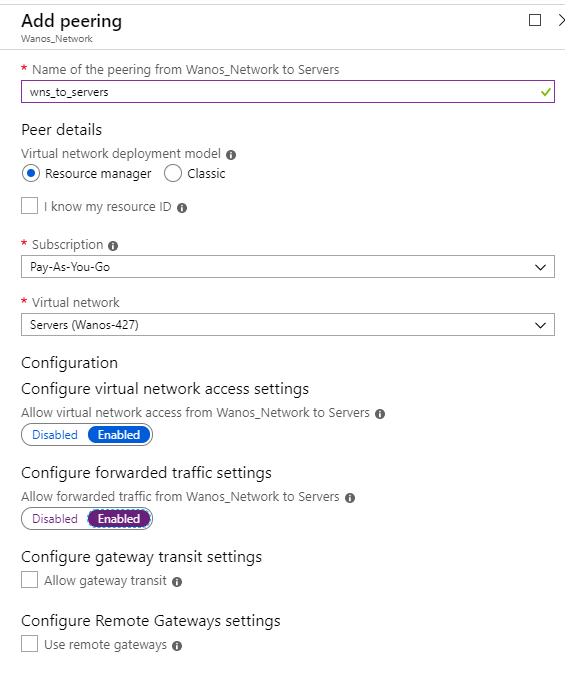
Enable virtual network peering from both Wanos to the Server networks and from Servers to Wanos. When creating the peering, enable Forwarded Traffic on both peering configs.
Add a route table on both Wanos and Server networks. Point the on-premises routes to the Azure Wanos IP.
Screenshots
Enable IP Forwarding on the Wanos Network Interface
Create a peering from the Wanos network to Servers
Repeat this step by creating a peering from Servers to Wanos
Note: Enable Forwarded Traffic in both peering configs
Create a new route table.
Name and associate the routing table to the Wanos Network subnet.
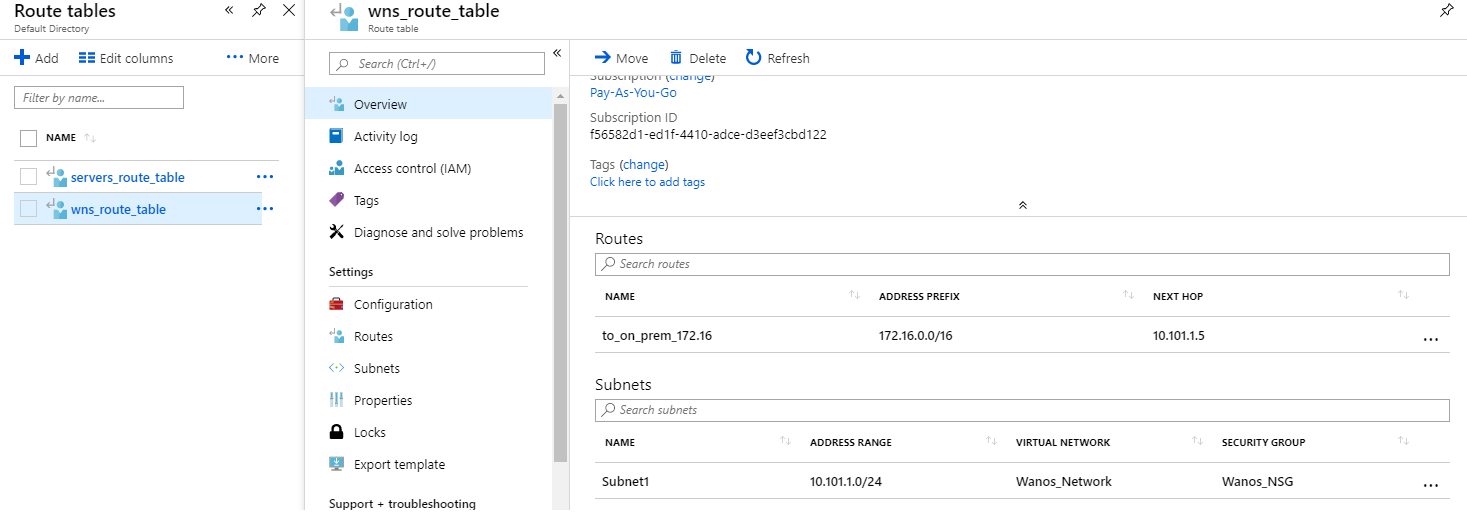
Add a new route with destination as the on-premises network with next hop as the Wanos IP.
In this example 172.16.0.0/16 is the on-premises network and 10.101.1.5 is the Wanos Gateway.
Create a second route table associated to the Server Subnet. Repeat the same config as the previous example. If a route table is already associated to the Server subnet then only add the route to the existing route table.
Full Deployment Script
For ease of use here is the full script with comments.
# Login to Azure Resource Manager
Login-AzureRmAccount
# Select the Azure Subscription where you want to deploy Wanos to
Select-AzureRmSubscription -SubscriptionName chrislazari
# Set your global variables
$subscriptionName = "chrislazari" # Enter your subscription name here

$resourceGroupName = "Wanos" # Enter a unique resource group name or leave as wanos

$locationName = "westeurope" # Enter which Azure location you want your resources to reside in

$virtualNetworkName = "Wanos_Network" # Enter a unique network name or leave as default

$virtualNetworkSubnetName = "Subnet1" # Enter a unique subnet name or leave as default

$virtualPublicIpName = "Wanos_Public_IP" # Enter a descriptive name for the Public IP Address or leave as default

$virtualNICName = "WanosNIC01" # Enter a descriptive name for the Virtual Network Interface Card or leave as default

$networkSecurityGroupName = "Wanos_NSG" # Enter a descriptive name for the Network Security Group or leave as default

$virtualMachineName = "Wanos_VM" # Enter a descriptive name for the Virtual Machine or leave as default

$virtualMachineSize = "Basic_A2" # Enter an Azure VM Size. The current setting is the minimum requirement for Wanos

$virtualMachineOSDiskName = "Wanos_OS" # Enter a descriptive name for the VM OS Disk or leave as default

$storageAccountName = "wanostest" # Enter a descriptive Storage Account Name or leave as default

$storageSKUName = "Standard_GRS" # Leave as default

$storageContainerName = "vhd" # Leave as default

$sourceVHD = "https://wanosds0.blob.core.windows.net/vhd/wanos-427.vhd" # Leave as default

$destinationBLOB = "wanos.vhd" # Leave as default

$destinationvhd ="https://wanostest.blob.core.windows.net/vhd/wanos.vhd" # Leave as default
# Create a new Resource Group
New-AzureRmResourceGroup -Location $locationName -Name $resourceGroupName
# Create and Configure a new Virtual Network
New-AzureRmVirtualNetwork -ResourceGroupName $resourceGroupName -Name $virtualNetworkName -AddressPrefix 10.101.0.0/16 -Location $locationName

$vnet = Get-AzureRmVirtualNetwork -ResourceGroupName $resourceGroupName -Name $virtualNetworkName

Add-AzureRmVirtualNetworkSubnetConfig -Name $virtualNetworkSubnetName -VirtualNetwork $vnet -AddressPrefix 10.101.1.0/24

Set-AzureRmVirtualNetwork -VirtualNetwork $vnet
# Create and Configure a Virtual Network Interface
$virtualNetwork = Get-AzureRmVirtualNetwork -ResourceGroupName $resourceGroupName -Name $virtualNetworkName

$publicIp = New-AzureRmPublicIpAddress -Name $virtualPublicIpName -ResourceGroupName $ResourceGroupName -Location $locationName -AllocationMethod Dynamic

$networkInterface = New-AzureRmNetworkInterface -ResourceGroupName $resourceGroupName -Name $virtualNICName -Location $locationName -SubnetId $virtualNetwork.Subnets[0].Id -PublicIpAddressId $publicIp.Id
# Create and Configure a Network Security Group and bind it to the Virtual NIC
$nsg = New-AzureRmNetworkSecurityGroup -ResourceGroupName $ResourceGroupName -Location $locationName -Name $networkSecurityGroupName

$nic = Get-AzureRmNetworkInterface -ResourceGroupName $ResourceGroupName -Name $virtualNICName

$nic.NetworkSecurityGroup = $nsg

Set-AzureRmNetworkInterface -NetworkInterface $nic
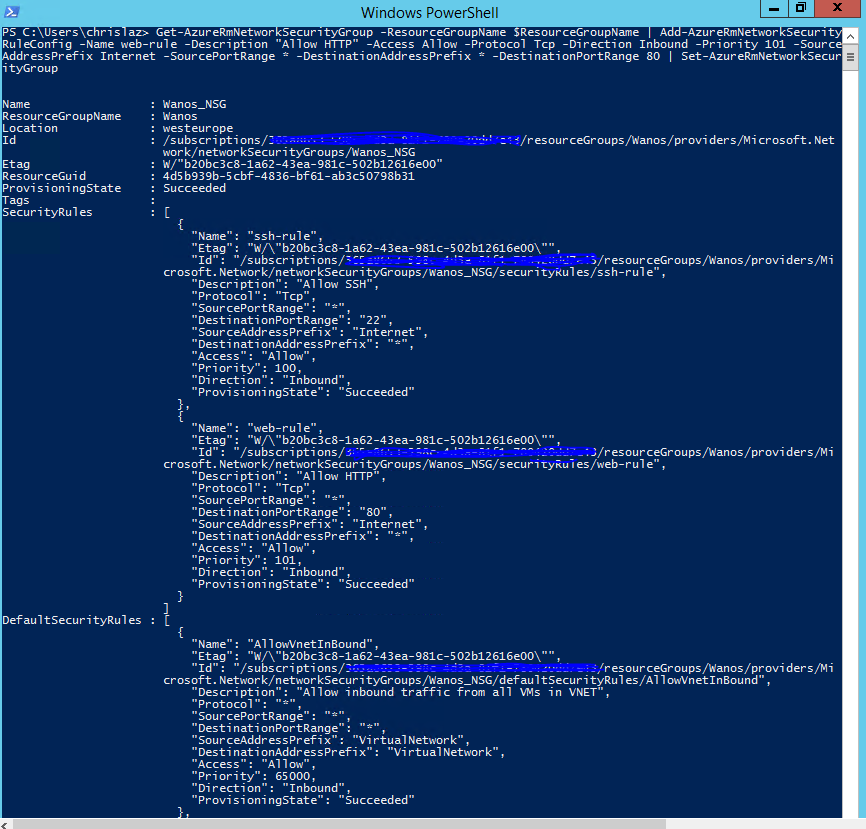
# Create and add SSH and HTTP Rules to Network Security Group
Get-AzureRmNetworkSecurityGroup -ResourceGroupName $ResourceGroupName | Add-AzureRmNetworkSecurityRuleConfig -Name ssh-rule -Description "Allow SSH" -Access Allow -Protocol Tcp -Direction Inbound -Priority 100 -SourceAddressPrefix Internet -SourcePortRange * -DestinationAddressPrefix * -DestinationPortRange 22 | Set-AzureRmNetworkSecurityGroup

Get-AzureRmNetworkSecurityGroup -ResourceGroupName $ResourceGroupName | Add-AzureRmNetworkSecurityRuleConfig -Name web-rule -Description "Allow HTTP" -Access Allow -Protocol Tcp -Direction Inbound -Priority 101 -SourceAddressPrefix Internet -SourcePortRange * -DestinationAddressPrefix * -DestinationPortRange 80 | Set-AzureRmNetworkSecurityGroup
# Create Storage Account and Storage Container for Wanos VHD
New-AzureRmStorageAccount -ResourceGroupName $ResourceGroupName -AccountName $storageAccountName -Location $locationName -SkuName $storageSKUName

$keys = Get-AzureRmStorageAccountKey -ResourceGroupName $ResourceGroupName -Name $storageAccountName

$storageContext = New-AzureStorageContext -StorageAccountName $storageAccountName -StorageAccountKey $keys[0].Value

New-AzureStorageContainer -Context $storageContext -Name $storageContainerName
# Copy Wanos VHD to Local Storage Container
$keys = Get-AzureRmStorageAccountKey -ResourceGroupName $ResourceGroupName -Name $storageAccountName

$storageContext = New-AzureStorageContext -StorageAccountName $storageAccountName -StorageAccountKey $keys[0].Value

$blob1 = Start-AzureStorageBlobCopy -srcUri $sourceVHD -DestContainer $storageContainerName -DestBlob $destinationBLOB -DestContext $storageContext

#Sleep for 5 minutes to ensure copy is completed before starting VM creation

Start-Sleep -s 300
# Create and Configure Virtual Machine
$vmConfig = New-AzureRmVMConfig -VMName $virtualMachineName -VMSize $virtualMachineSize

$vmConfig = Set-AzureRmVMOSDisk -VM $vmConfig -Name $virtualMachineOSDiskName -VhdUri $destinationVhd -CreateOption Attach -Linux

$vmConfig = Add-AzureRmVMNetworkInterface -VM $vmConfig -Id $networkInterface.Id

$vm = New-AzureRmVM -VM $vmConfig -Location $locationName -ResourceGroupName $resourceGroupName
Update Software
Ensure to run the latest Wanos version. A step-by-step wanos update process guide is available.
License Activation
Unlock all Wanos features by activating a license. Please refer to the License Activation article. This step is also required for Trial use.
Username and Password
The login details for the Appliance and Web UI is in the Username and Password FAQ section.