Quick Start Guide – VMware
Wan Optimization Virtual Appliance – VMware
Step by Step Guides with screenshots:
Single VM install on ESXi
Complete Lab on ESXi
Quick Start Guide:
It is recommended to use the OVA package to create the wan optimization virtual appliance. When using the VMDK file steps 1-3 from this guide is required.
By default Wanos runs in bridge or switch mode. In this back to back lab example, theoretically no configuration is required on the wan optimization appliance to test optimization. In other words, it is plug and play, as long as the wan0 and lan0 are plugged into the correct networks.
Quick Start Guide Steps
- After downloading and extracting the virtual appliance files, create a new Linux Virtual Machine. Select “Install Operating System” later and use fixed disk space. Configure a minimum of 2 GB memory for a point to point deployment and 4 GB for a MultiSite network.
- Once the Virtual Appliance has been created, edit the default settings before attempting to boot. Remove the default SCSI drive and add a new SATA or IDE drive. Use an existing virtual hard drive and select the wanos.vmdk file.
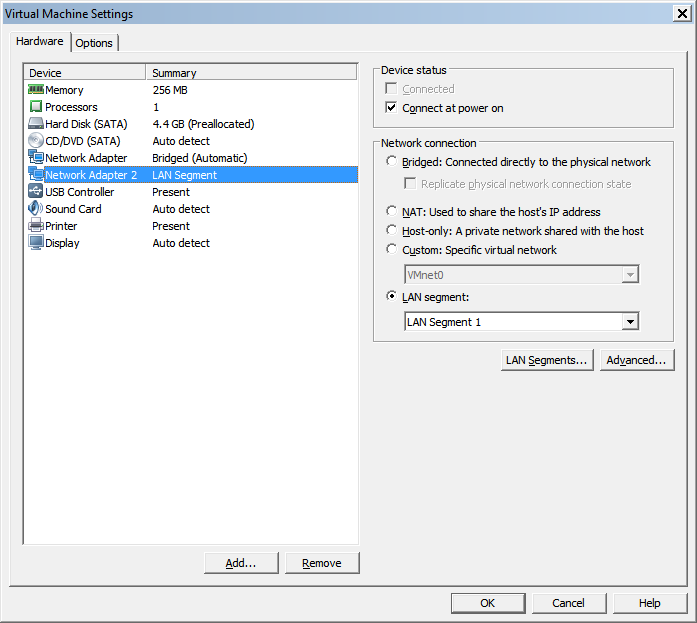
- VMware Workstation or Player: Change the first interface to bridge mode and add a second network interface to bridge. Use the virtual network editor to map the physical interfaces to virtual interfaces. When in a lab scenario, use “Lan Segment 1″ for the second interface on the server side device. This will simulate the WAN link. On the second device use “Lan Segment 1″ to connect to the WAN and “Lan Segment 2″ to connect to a workstation to simulate a branch user. When cloning a virtual machine, select ‘regenerate mac address’.
VMware ESX/ESXi: See the ESXi virtual lab and the vSphere vSwitch Guide for more advance VMware vSwitch environments. - Save settings and if prompted to convert to the newer format, select yes.
- Important: Before booting the machine verify that lan0 and wan0 are not connected to the same network segment to ensure the bridge appliance will not introduce a loop. The wan0 interfaces should connect to the wan gateway network and the lan0 interfaces to the isolated separate lan networks.
- Boot and open https://192.168.1.200 from a device on the same IP range. Set the permanent IP address and gateway via the GUI or alternatively running the command line utility wanos-cfg from the console. The device uses only a single IP address.
Enabling Optimization
Once traffic starts to flow, each appliance will automatically detect when a peer comes online or goes offline. Peer status can be verified with the Reports -> Peer Status tab. Once a peer is discovered, they automatically start, detect and end the optimized stream. By default optimization is enabled for all TCP traffic. In production use the traffic policies to exclude subnets or protocols if required. To optimize only a specific site, for example if some sites don’t have appliances yet, create a traffic policy to optimize only the required traffic.
Troubleshooting
‘Peer detected on lan0′ is an indication that the cables are reverse. Use the virtual machine configuration or the “Switch Interface Port Roles” checkbox under “Network Interfaces” to swap the port roles. After final setup, clear the datastores for good measure.
In production networks, start with a default bypass policy. After making final changes to the MultiSite configuration, clear the datastores on all ends.
The LAN and WAN interfaces are configured to bridge traffic and have no IP addresses. One network interface should connect to the WAN Router or Firewall or when using VLAN’s the outside VLAN. The second interface needs to connect to the LAN segment or inside VLAN. Together they form a virtual inpath interface. See the Cabling Guide for tips on identifying the lan0 and wan0 interfaces.
A common error occurs when booting the appliance without meeting the minimum of two network interfaces requirement. In this case add the second interface, boot the appliance and reset to factory defaults:
/etc/wanos/clean.sh
A common error occurs when attaching the wanos.vmdk virtual disk to the default VMware SCSI controller. To resolve, remove the default SCSI controller and attach a new SATA or IDE virtual controller and attached the wanos.vmdk drive. For performance reasons a SCSI drive can be attached as a secondary drive.
How to test:
- Create a file share via CIFS, FTP or HTTP on the server.
- Copy or Download a File across the WAN. Verify optimization.
- Copy or Download the same file and verify optimization.
- Make changes to the file and copy for a third time and note the optimization.
Default Settings:
IP Address: 192.168.1.200/24
Default Gateway: 192.168.1.1
Web Username: wanos
Web Password: wanos
Console Username: tc
Console Password: ChangeM3